While looking for/at tutorials on the web, I came across one by Naoki Shibuya that was based on a lot more thinking than my approach. In it, Having Fun with Deep Convolutional GANs, he cleverly kept the image size at 28 x 28 pixels.
Unlike me he was able to see that a 28 * 28 pixel image can be reshaped to 16 feature maps of 7 x 7 pixels each. I.E. 4 x 7 x 4 x 7 = 16 x 7 x 7. And after the application of two, properly configured, transposed convolutional layers the feature maps would be 28 x 28. So, in the generator, he used a fully connected linear layer to read in the image and output a 1D feature map 28 x 28. He then reshaped that feature map accordingly and proceeded to forward it through two convolutional layers to generate a 28 * 28 image.
The discriminator essentially does the reverse.
We will for the reshaping process define a class which we will be able to instantiate as a layer in our models. As a consequence I’ll be using the design/coding style used for the classifier model for Project 1. Let’s give it a go.
Reshaping Class
Because the reshaping is to be done as one of the layers of the model, we need to define a custom network model layer like the linear or convolutional methods provided by PyTorch. This is definitely a bit different than what I expected.
I was originally going to use view() to do the reshaping. but in the PyTorch docs it says:
When it is unclear whether a view() can be performed, it is advisable to use reshape(), which returns a view if the shapes are compatible, and copies (equivalent to calling contiguous()) otherwise.
Since I needed to add an extra dimension I used reshape as I currently don’t know if view would work for that. The -1 is needed to generate the 4D tensor wanted by the subsequent convolutional layer.
Note: I later did a bit of testing and apparently I could have, in this case, used
viewwithout a problem.
Note the use of *shape to transform the input parameters into a tuple for saving as a class variable.
class Reshape(nn.Module):
  def __init__(self, *shape):
    super(Reshape, self).__init__()
    self.shape = shape

  def forward(self, x):
    # return x.view(self.shape)
    return x.reshape(-1, self.shape)
The reshaping will end up outputting 16 7 x 7 feature maps for further processing by the convolutional layers. In the case of the generator, two layers will produce feature maps of 14 x 14 and finally 28 x 28 pixels.
Generator
Now let’s code the generator class using our new custom layer. I will not be using nn.Sequential this time around. Instead layers will be defined in the initialization method. And called in the forward method. This is apparently a best practice. (But don’t know that for sure.) The PyTorch tutorial does in fact use the Sequential method for the complete model. I will be using it in the definition of the individual layers.
Since we will be reshaping the input, we will use a fully connected layer to accept the training input. Apply the reshaping layer and then forward it through two ConvTranspose2d layers.
As for the kernel size, stride and paddings (see the code), well:
where: \(n_{out}\) is our output matrix dimension size,
\(n_{in}\) is the input matrix dimension size,
\(k\) is the pooling kernel dimension size, and
\(p\) is padding size
\(p_{out}\) is output padding size
\(s\) is stride size
In our case, the 7x7 features will after the first ConvTranspose2d layer be:
  # define Generator model class, it should "mirror" the discriminator
  class Generator(nn.Module):
    def __init__(self, noise_size: int):
      super().__init__()

      # sample_size => 784
      self.fc = nn.Sequential(
        nn.Linear(noise_size, 784),
        nn.BatchNorm1d(784),
        nn.LeakyReLU())

      # 784 => 16 x 7 x 7
      self.reshape = Reshape(16, 7, 7)

      # 16 x 7 x 7 => 32 x 14 x 14
      self.conv1 = nn.Sequential(
        nn.ConvTranspose2d(16, 32,
                           kernel_size=5, stride=2, padding=2,
                           output_padding=1, bias=False),
        nn.BatchNorm2d(32),
        nn.LeakyReLU())

      # 32 x 14 x 14 => 1 x 28 x 28
      self.conv2 = nn.Sequential(
        nn.ConvTranspose2d(32, 1,
                           kernel_size=5, stride=2, padding=2,
                           output_padding=1, bias=False),
        nn.Tanh())

      # Random value sample size
      self.noise_size = noise_size

    def forward(self, z):
      # Inputs are the sum of random inputs and label features
      x = self.fc(z)        # => 784
      x = self.reshape(x)   # => 16 x 7 x 7
      x = self.conv1(x)     # => 32 x 14 x 14
      x = self.conv2(x)     # => 1 x 28 x 28
      return x
Discriminator
Now the discriminator should effectively mirror the generator.
  # define Discriminator model class
  class Discriminator(nn.Module):
      def __init__(self):
          super().__init__()

          # 1 x 28 x 28 => 32 x 14 x 14
          self.conv1 = nn.Sequential(
              nn.Conv2d(1, 32,
                        kernel_size=5, stride=2, padding=2, bias=False),
              nn.LeakyReLU())

          # 32 x 14 x 14 => 16 x 7 x 7
          self.conv2 = nn.Sequential(
              nn.Conv2d(32, 16,
                        kernel_size=5, stride=2, padding=2, bias=False),
              nn.BatchNorm2d(16),
              nn.LeakyReLU())

          # 16 x 7 x 7 => 784
          self.fc = nn.Sequential(
              nn.Flatten(),
              nn.Linear(i_sz, i_sz),
              nn.BatchNorm1d(i_sz),
              nn.LeakyReLU(),
              nn.Linear(i_sz, 1),
              nn.Sigmoid()
          )

      def forward(self, z):
          # Extract image features using convolutional layers
          x = self.conv1(z)    # => 32 x 14 x 14
          x = self.conv2(x)    # => 16 x 7 x 7
          outp = self.fc(x)    # => 1
          return outp
Training
Okay, I pretty much copied over all the code from the previous project module. Then added/refactored as described above.
I also changed the learning rate for the generator. Something I noticed in one of the tutorials. The discriminator is still at 0.0001, but the generator is now at 0.001. As vaguely discussed above, I have, as well, changed the kernel size, stride and such for the convolutional layers (pretty much stole those values from the article referenced in the introduction).
I will try running the module without major changes to the other functions (training individual models, plotting, GAN training loop, etc.). Though a goodly number of variables will not now be used and some of the code will need to be changed to account for the differences describe above. I.E. I now have d_lr = 0.0001 and g_lr = 0.001. So need to change the lr variable as appropriate where they are being used.
And, just realized, I will have to alter the transformer to not resize the images when the data is being loaded. Not to mention that as the first layer of the generator is linear, I will need to modify how my noise tensors are generated (noise = torch.randn(batch_sz, nz)).
Sadly, I was not getting any training done on the first couple attempts. I eventually had to switch the generator and discriminator between training and evaluation modes. Not sure why. Perhaps because the first layer is linear rather than convolutional. In the previous post/project all the layers were convolutional and switching between modes was not required. In fact, from what I have read, it is not recommended to do so.
Here’s the command line output.
(mclp-3.12) PS F:\learn\mcl_pytorch\chap4b> python cnn_clothing.py
epoch 1, d_loss: 0.8955634832382202, g_loss: 1.0468263626098633
epoch 2, d_loss: 0.6420727372169495, g_loss: 0.9804386496543884
epoch 3, d_loss: 0.35529226064682007, g_loss: 1.3113796710968018
epoch 4, d_loss: 0.2597275972366333, g_loss: 2.1346185207366943
epoch 5, d_loss: 0.23678772151470184, g_loss: 2.541435718536377
epoch 6, d_loss: 0.5889017581939697, g_loss: 1.6740680932998657
epoch 7, d_loss: 0.745252788066864, g_loss: 1.3494538068771362
epoch 8, d_loss: 0.7568106055259705, g_loss: 1.3433009386062622
epoch 9, d_loss: 0.7432184219360352, g_loss: 1.345159888267517
epoch 10, d_loss: 0.7160804271697998, g_loss: 1.3703895807266235
epoch 11, d_loss: 0.6989092230796814, g_loss: 1.4097250699996948
epoch 12, d_loss: 0.6814627647399902, g_loss: 1.4478625059127808

time to train GAN : 166.9653530002106
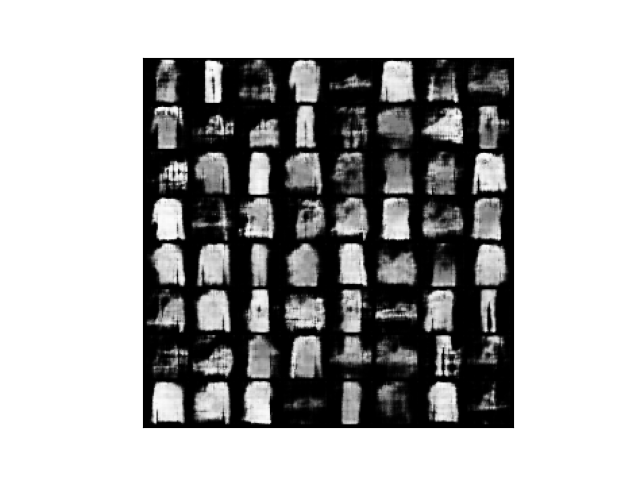
And here are some of the images generated during training.


Starting to see some viable clothing.

And for comparison here’s a sample of images after the 12th epoch from the previous post.
I would say the current DCGAN is producing visibly better results after the same amount of training. Though I really do not understand why there is a slower start for the current DCGAN code. And such a speedier improvement. Initial epochs not as good as previous version. But later epochs improving significantly faster. The two models are fundamentally the same expect for a few almost trivial changes.
Is it the changes to the models? Or to the learning rate? Or kernel size? Or…
Done
Think that’s enough for this post. Left a lot of the code for you to sort out yourself if you plan on trying this project.
But I am definitely pleased to get it to work. And that someone had a solution that didn’t require resizing the images before training the GAN.
May your future code searches be as fruitful.
Resources
- PyTorch: Custom nn Modules
- torch.Tensor.view
- torch.Tensor.reshape
- What is reshape layer in pytorch?